Now that we have created a web server containing WordPress and have it tunnelling to cloudflare to serve the website at our domain we need to make sure the website is secure, specially if the website will have any login form, process any payment or any other form. Honestly in todays internet every website should have a valid ssl certificate, some of the modern browsers even block or show a ugly warning every time you are surfing a insecure website or a website that does not have a valid SSL certificate.
Don’t forget your domain have to be accessible also by www.domain or you will have to customise what is in this guide, you can see how to get the www. working with Cloudflare tunnel in this link.
docker run -it --rm --name certbot -v "/Volumes/CLOSED/sites/cert/portugaline:/etc/letsencrypt" -v "/Volumes/CLOSED/sites/cert/lib:/var/lib/letsencrypt" -v "/Volumes/CLOSED/sites/portugaline:/var/www/html" certbot/certbot certonly --webroot --webroot-path /var/www/html -d portugaline.com -d www.portugaline.comAn example Apache virtual host configuration file for your WordPress container with SSL enabled. You can save this file as /Volumes/CLOSED/sites/portugaline/apache.conf.
<VirtualHost *:80>
    ServerName portugaline.com
    ServerAlias www.portugaline.com
    DocumentRoot /var/www/html

    ErrorLog ${APACHE_LOG_DIR}/error.log
    CustomLog ${APACHE_LOG_DIR}/access.log combined

    RewriteEngine On
    RewriteRule ^(.*)$ https://%{HTTP_HOST}$1 [R=301,L]
</VirtualHost>

<VirtualHost *:443>
    ServerName portugaline.com
    ServerAlias www.portugaline.com
    DocumentRoot /var/www/html

    ErrorLog ${APACHE_LOG_DIR}/error.log
    CustomLog ${APACHE_LOG_DIR}/access.log combined

    SSLEngine on
    SSLCertificateFile /etc/letsencrypt/live/portugaline.com/fullchain.pem
    SSLCertificateKeyFile /etc/letsencrypt/live/portugaline.com/privkey.pem

    <Directory /var/www/html>
        AllowOverride All
        Require all granted
    </Directory>
</VirtualHost>
The default container with WordPress don’t have any SSL support so we will create a new image with base on the image WordPress we already have been using and add SSL support, after this we will have a new image we can use called WordPress.ssl. I prefer to create a new image with the SSL support instead of login in to the container and fix the problem there because I want to have a clean image that I can use to run any website with WordPress and SSL just using the docker command. So the Dockerfile I created is this:
FROM wordpress

RUN apt-get update && apt-get install -y apache2 && \
    a2enmod ssl && \
    apt-get clean && \
    rm -rf /var/lib/apt/lists/*
Then all i have to do is run the command below and we have a new image ready to use based on the image WordPress with ssl in it.
docker build -t wordpress.ssl .Because we cannot create a certificate for “portugaline” without any dots, and we need the cloudflare tunnel to connect to the container “portugaline”, the best is just to change the name of the container from “portugaline” to “portugaline.com” We will also mount as before the folder “/Volumes/Closed/sites/portugaline” to “/var/www/html” And the certificate we generated in the beginning will be mounted to “/etc/letsencrypt”, the acapche.conf we will do the same mount it to /etc/apache2/sites-enabled/000-default.conf
docker run --name portugaline.com --network sites -p 80:80 -p 443:443 -v /Volumes/CLOSED/sites/portugaline:/var/www/html -v /Volumes/CLOSED/sites/cert/portugaline:/etc/letsencrypt -v /Volumes/CLOSED/sites/portugaline/apache.conf:/etc/apache2/sites-enabled/000-default.conf -d wordpress.ssl
Cloudflare Settings:
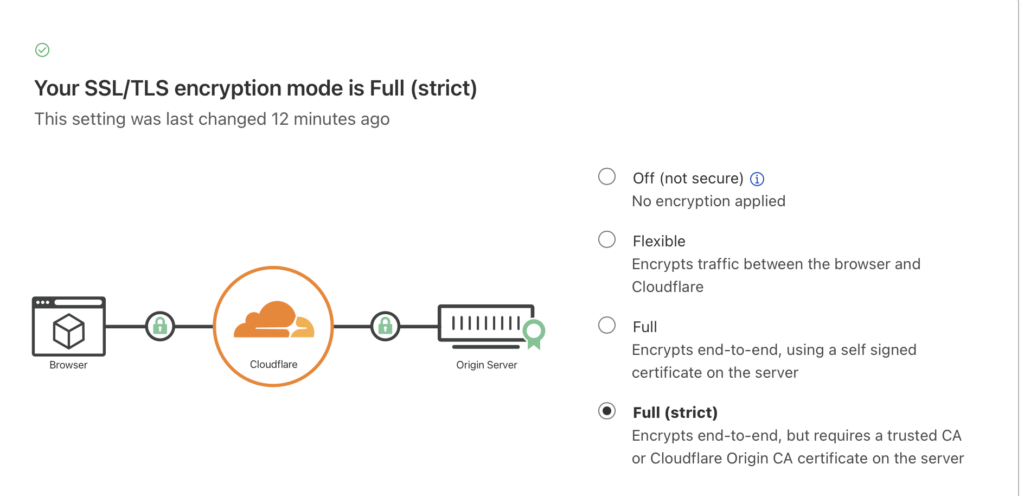
In your cloudflare you should change you SSL settings from flexible to Full (strict) see below:

Also you will need to change the port and container name on your cloudflare tunnel container. you can remove the old one and run docker run to create the new container and new port because ssl uses port 443 and not port 80, here is an example:
docker run -d --name cloud_portugaline \
--network sites \
cloudflare/cloudflared:latest tunnel --no-autoupdate run --url http://portugaline.com:443 --token eyJhIjoiZmRjYWE0YmZhNjhmMDAyMGFkM2Y0Mjk3ZjZlZDMwMTYiLCJ0IjoiZGIwMjQ5ZTUtYTk1YS00MzFjLTg0NzgtODZhOGRjOGI3MTlhIiwicyI6Ik5qSmtZbVprTlRjdFpURmhNeTAwWldOakxXSmxOVGN0TWpjMU1qUXdPREfdghsdfgdsf
WordPress settings
Don’t forget to change in your WordPress general settings or directly on your WordPress database in table “wp_options” the website url from “http” to “https”

